Watercolour Negative Painting Tutorial
Add Amazing Depth to Your Art
This painting tutorial is based purely on the negative watercolour painting technique.

What is Negative Painting in Watercolour?
Negative painting is a technique where you paint around the subject rather than on the subject. It's a technique that can add depth and dimension to your paintings.
Negative painting challenges us to shift our perspective and concentrate on the surrounding negative space rather than the subject itself.
In this blog post I will explain how to do this technique, I'll provide some tips and I'll show you one of my negative watercolour paintings.
Why is it Called 'Negative' Watercolour Painting?
It's called negative painting because it refers to the technique of painting or utilising the area of negative space around a subject. You are effectively, painting the negative spaces in order to leave the positive shapes.
Negative spaces on a painting are those empty areas that surround your subject. The positive spaces or positive shapes, are the subject itself.
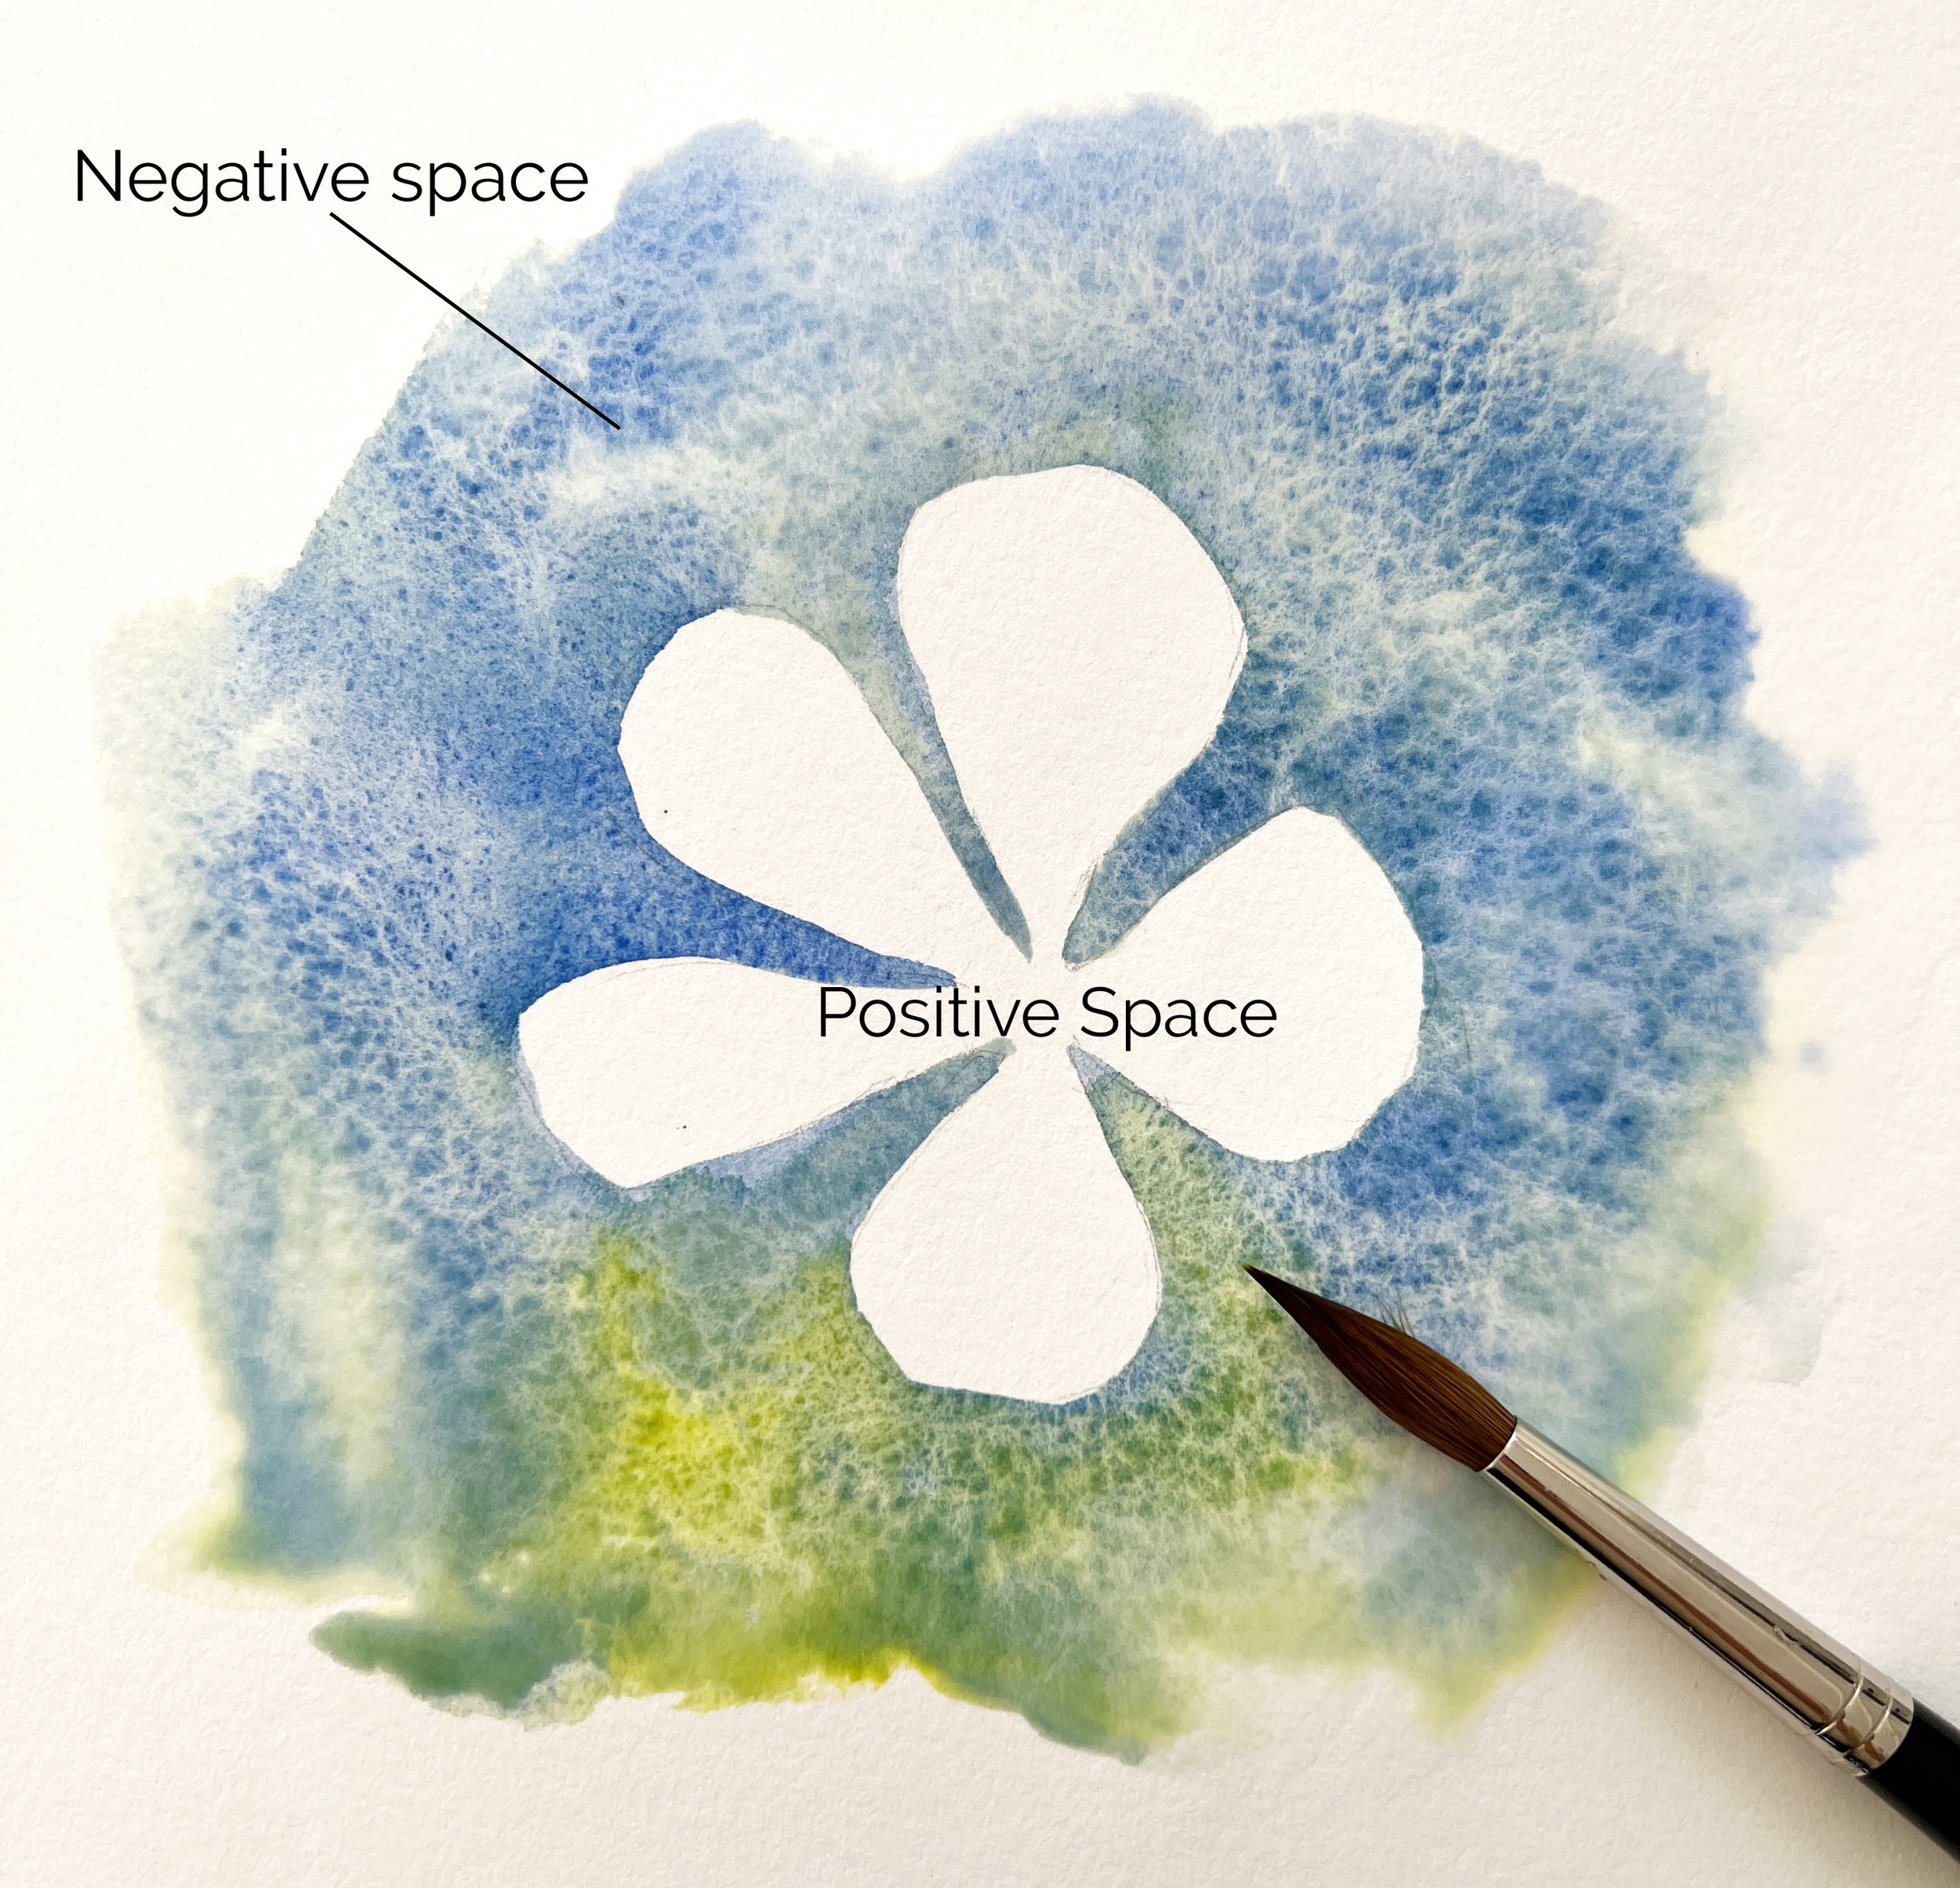
In the example below, instead of painting the flower I have painted the negative space around the flower. The background has formed the edges of the flower and the white area you see is the white of the paper showing. That is what negative painting is.
The positive space is the flower itself and the painted negative space is the background.
I didn't mask the flower when I painted around the petals but sometimes the use of masking fluid can make it easier to paint the background in.
How to use the Watercolour Negative Painting Technique
You can paint an entire painting using this technique.
Try to use transparent or semi transparent pigments and don't put the paint on too dark in the beginning. You need to work in layers.
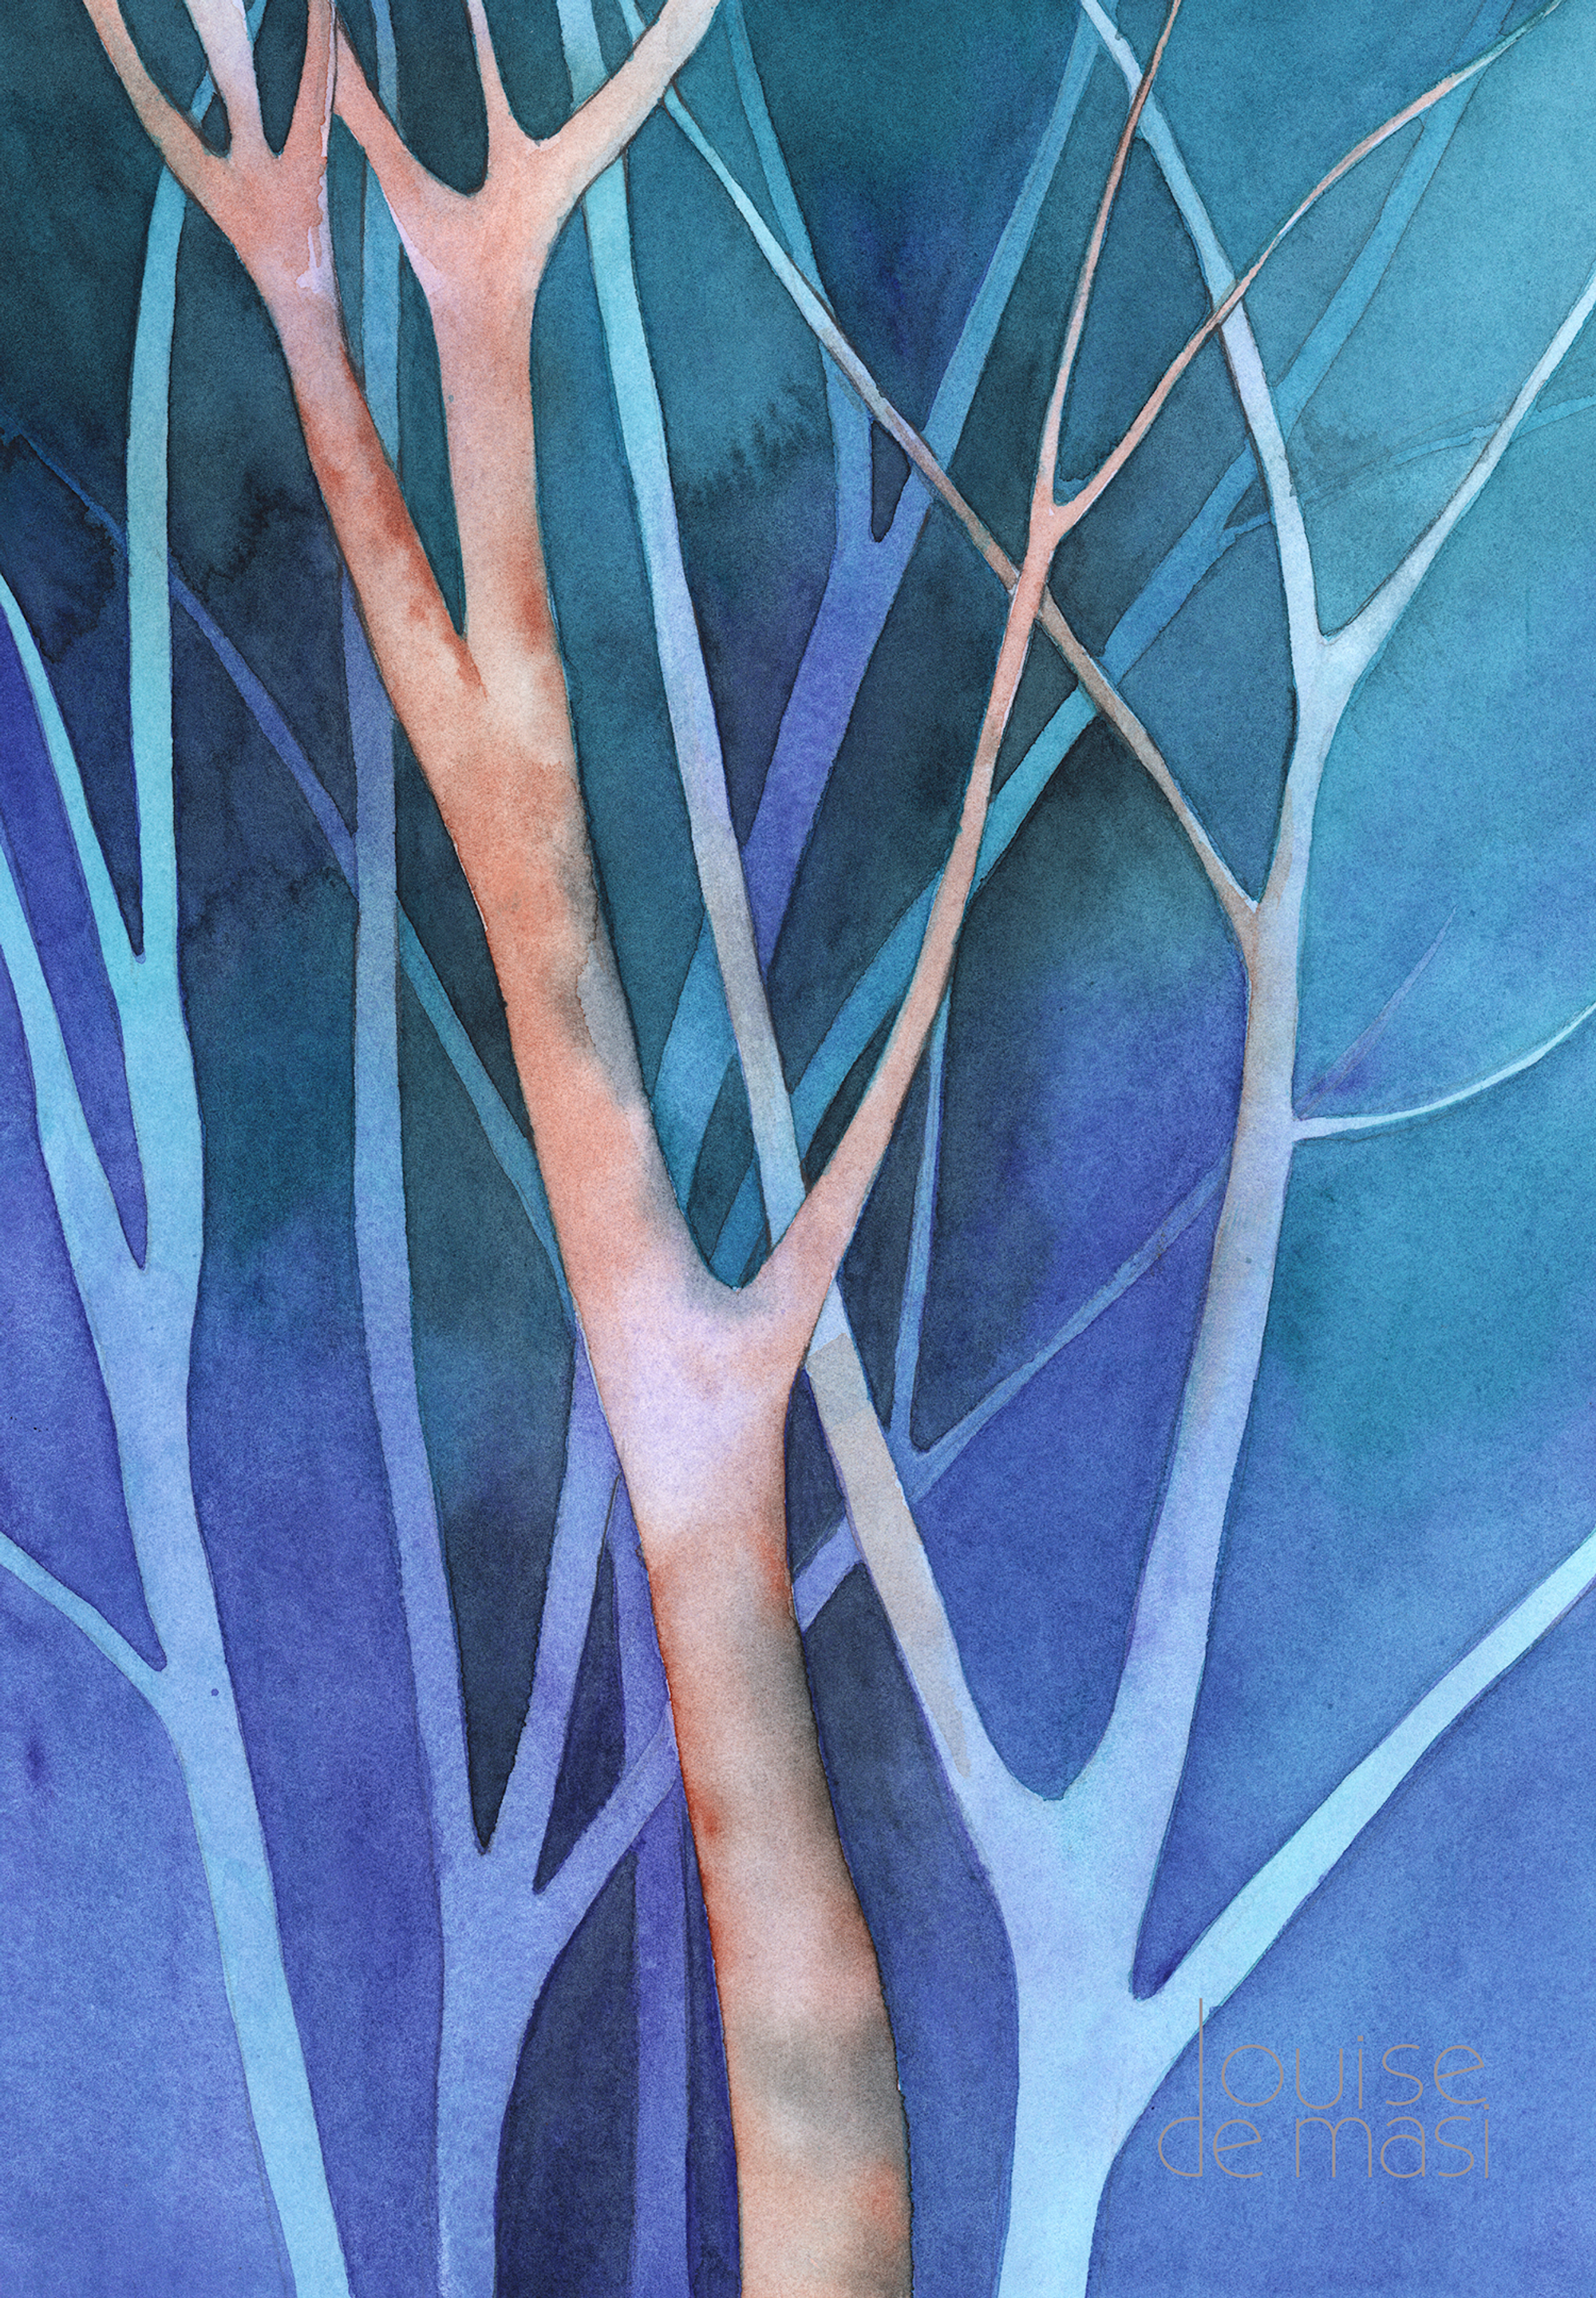
Below is a painting I did for a watercolour tutorial on Patreon.

Step 1: With this tree trunk painting, I drew all of the tree trunks onto my watercolour paper.
I tried to not make the negative spaces between the trunk and branches too small because if they are too small they become difficult and time consuming to paint.
When I was happy with the drawing, I painted a light variegated wash of colour over the entire watercolour paper.
When that was dry, I painted a second wash, but this time, I didn't paint any colour on the main tree trunk. Instead, I painted the negative space around the tree trunk.
The colour I used on the second wash will become the colour of the next tree trunk that I paint around.


Step 2: I waited until the watercolour paper was completely dry and then I repeated the process of painting negatively around the first tree trunk but I also painted around a second tree trunk this time.
The background is starting to get darker but the first and second trees remain the same.
Step 3: Now you can see that I have included a third tree trunk on the painting.
I paint a fourth layer of paint onto the background. This time I avoid putting any watercolour paint onto the first trunk, the second trunk and the third trunk. The background is getting a lot darker and there are new negative shapes to paint in.


Step 4: Yet another layer of paint is painted onto the background. This time I use the technique to paint the new negative shapes around 4 tree trunks.
Step 5: Now I included the 5th tree trunk. With this 6th layer of paint, none of the tree trunks were painted. All 5 of them were painted negatively by painting the negative space around them. This layer took a while because I had a lot more negative shapes to paint.

Step 6: My painting was very cold at this final stage and I thought the front tree trunk looked a bit flat. So to give it some three dimensional form, I decided to add some warmth by painting a wet on wet layer of Burnt Sienna onto it. Not only did that add some warmth to the watercolour painting, but it brought the tree trunk closer because warm colours advance and cool colours tend to recede.
All the way through the painting I used numerous glazes of semi transparent pigments to paint the negative shapes (or negative spaces) surrounding the tree trunks.
I have a video tutorial of this negative tree trunk painting on Patreon.
So that's a method to create depth using this technique on the entire painting. An alternative approach is to use this technique in different areas of your painting.
A Second Way to Use the Negative Watercolor Painting Technique
Instead of using this watercolour technique all over the painting, you can use it in certain areas of your painting to create some hard defined edges and detail.
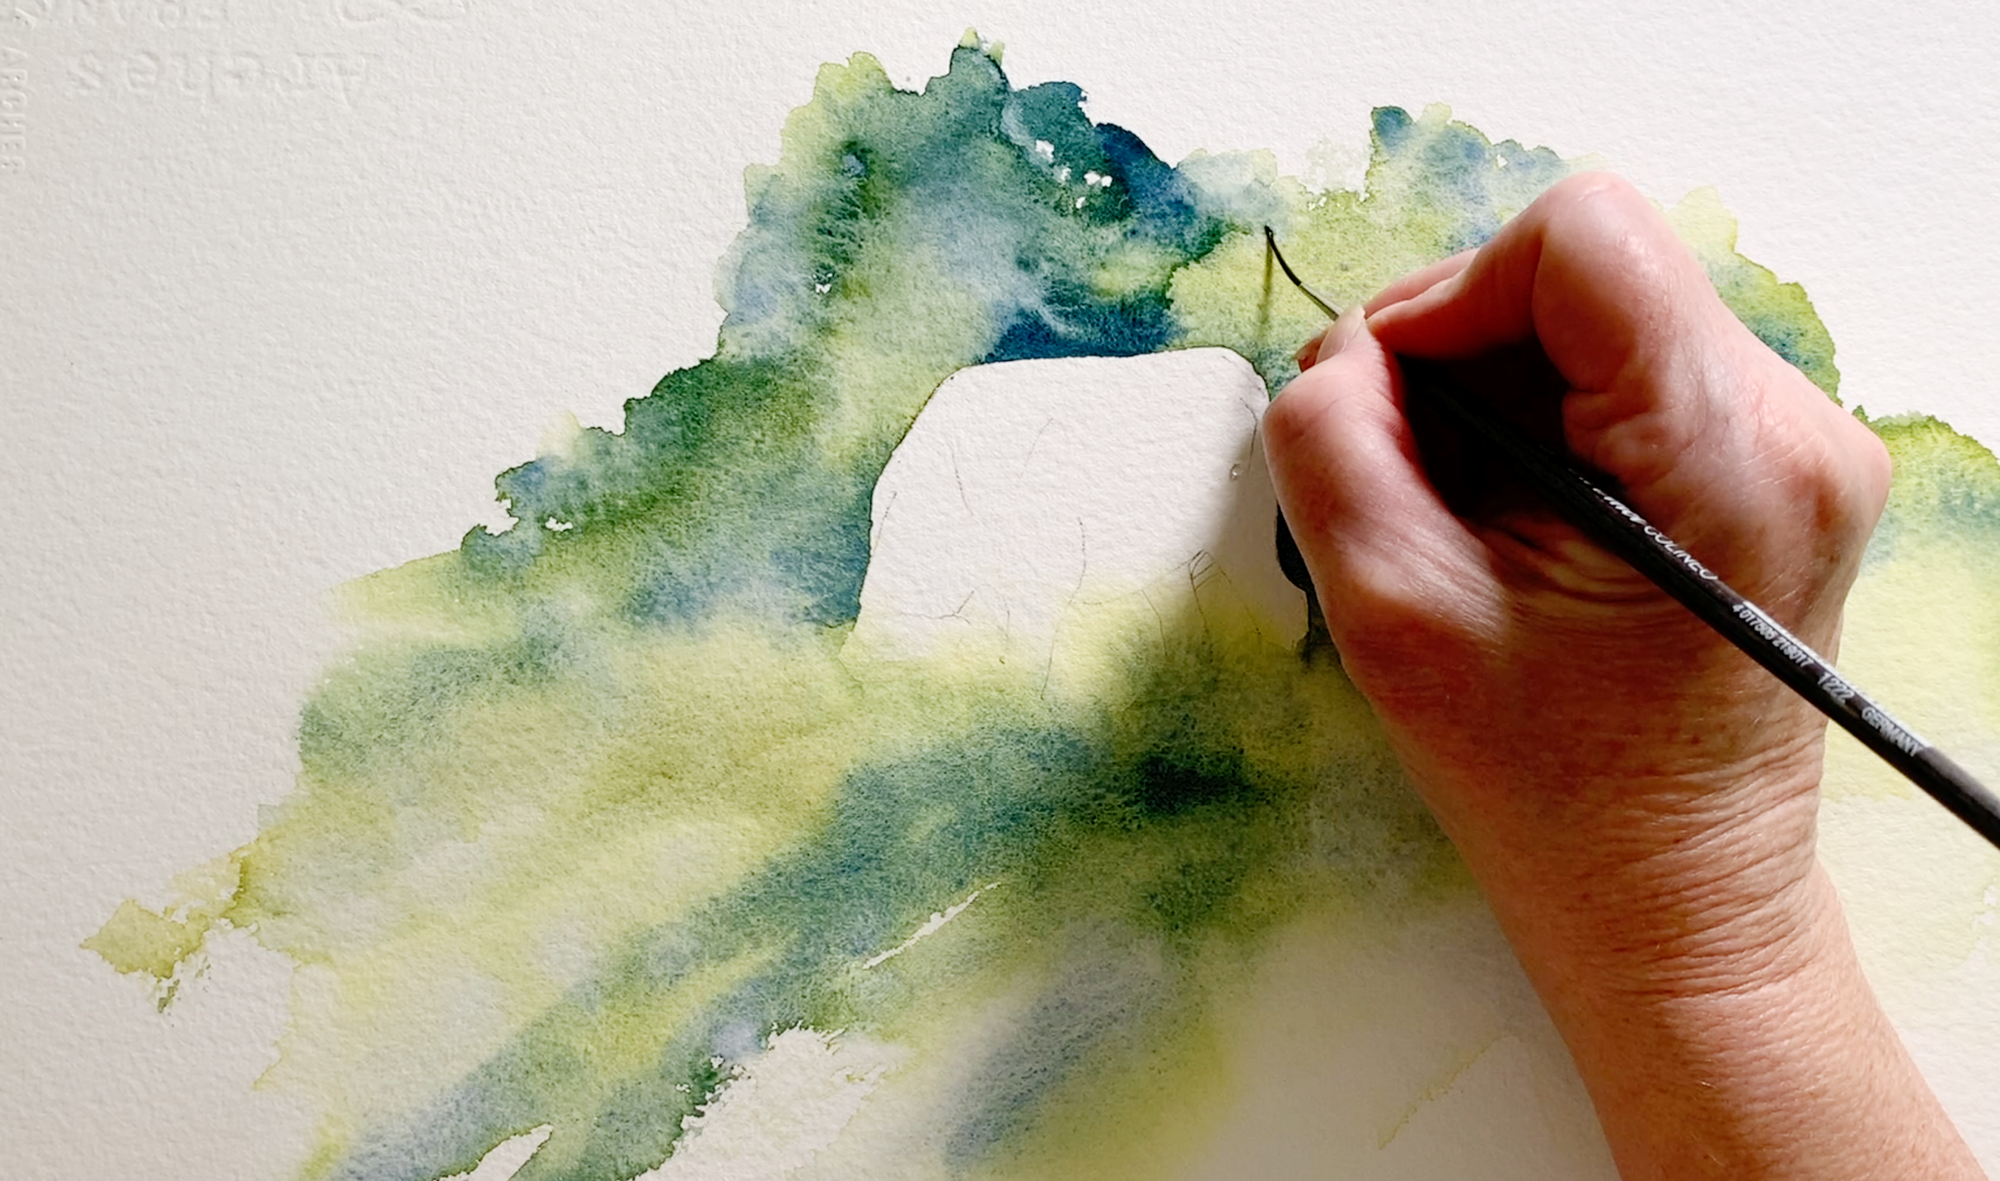
I used the negative watercolour painting technique on my cow vignette painting. I painted in a loose wash of shrubs behind the cows using greens that I mixed from French Ultramarine and Transparent Yellow. I dried that area and then I wet the paper behind a shrub I wanted to define. I painted some distinct hard edges on the damp surface to define the edge of the shrub.

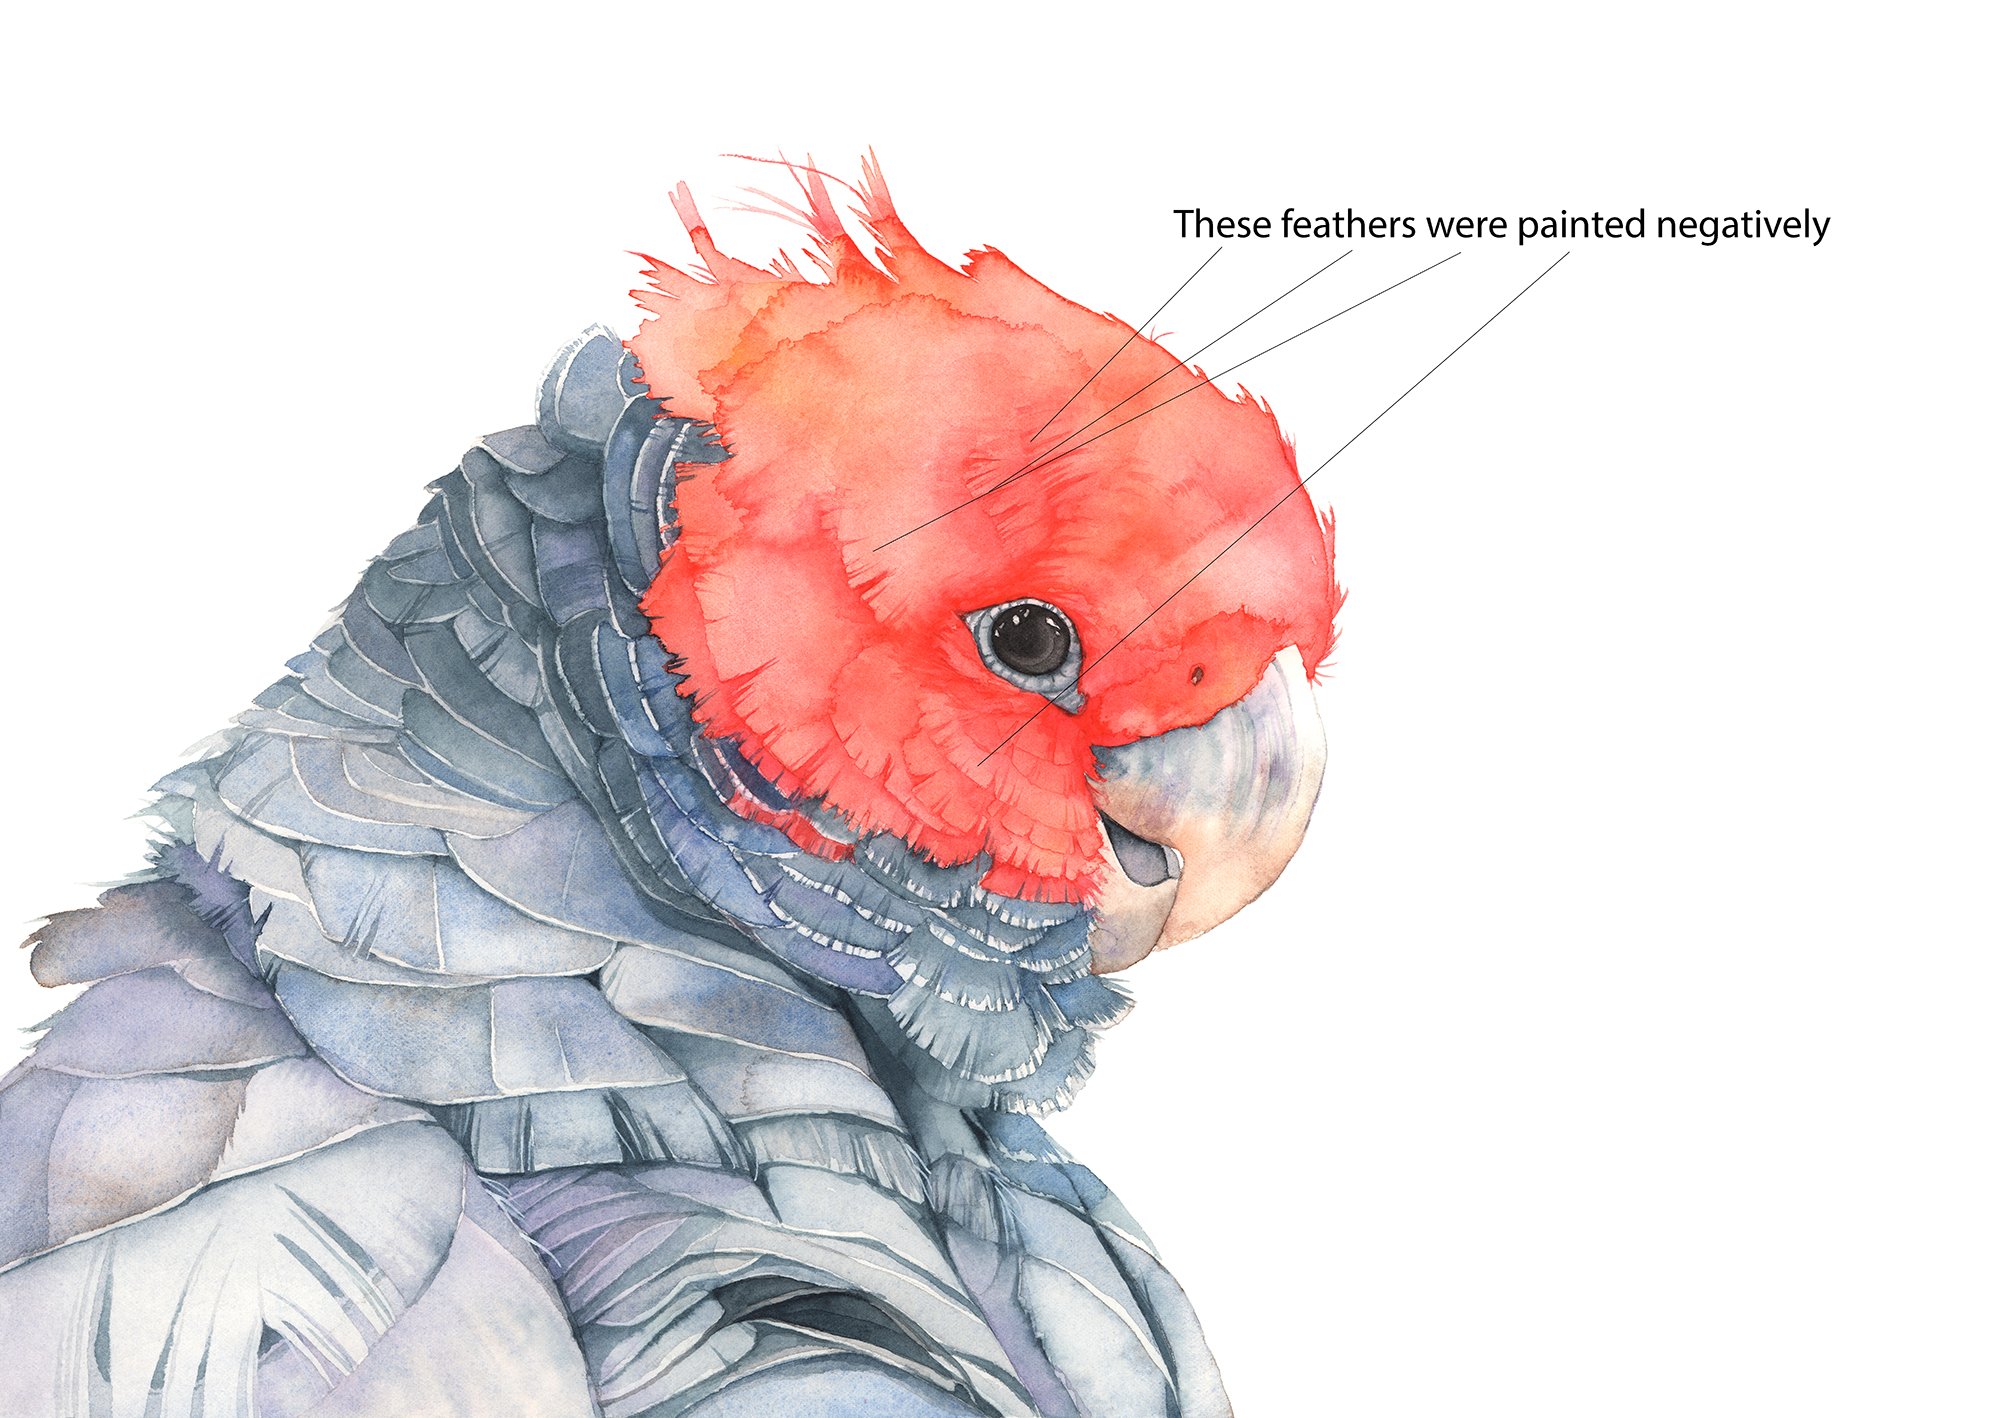
I often use this technique to render feathers on my bird paintings.


The feather detail on the neck and body of this Macaw were painted negatively. To define the edges of each feather I painted another layer of paint on the feather below. I usually do this on wet paper to keep paint edges soft.
The first layer of blue paint had dried. Then I wet the area underneath each feather, one feather at a time. Then while it was wet I painted in the edge of the feather above.

Wetting the paper beneath each feather allows the paint to softly drift away from the hard edge of the top feather. The hard edge defines the feather and the paint drifts over the feather below.
In the examples above, when I defined the edges of the shrubs on the cow painting, I painted behind the shrubs, not the shrub itself. With the Macaw painting, when I defined the edge of each feather, I painted behind or below the feather, not on the feather itself.
It's difficult to explain, but I have a video on Youtube where I demonstrate negative painting. It's much easier to watch the video than to try to explain this technique using words.
More reasons to learn how to use negative painting
Use this technique to create depth and dimension in your paintings. You can emphasise areas of your painting by painting a darker colour around them. By using positive and negative shapes you can draw attention to your focal area.
You can use negative watercolour painting techniques to improve the flow and movement of your painting. By painting around your subject and making use of negative and positive spaces, you can guide the viewer's eye through the painting.
Create some balance in your painting. Negative painting allows you to balance the positive and negative spaces in your composition. It makes you more aware of shapes other than the subject you are a painting and then you can alter them and make your composition more interesting.
Tips for Using the Negative Painting Technique
Remember when you are using this technique that you are painting the area surrounding the object not the object itself.
If you are using this technique over the entire paper, always start with the object that is closest, just as I did with the tree trunk painting above. That will help to create a focal point.
Each layer must dry completely before painting the next layer.
You can use masking fluid to help reserve the white areas
You can use a glazing technique on dry paper or you can work on a wet surface.
You can build layers by changing the value (the darkness) or you can build layers by changing the hue.
Once you have built up the layers you can start building up detail (refer to the main tree trunk on my painting)
Start with lighter colours and gradually work darker
Transparent pigments work best when you are layering
If you use opaque paints make sure you thin them with water.
Use a limited palette and it helps to keep the paint at the same consistency
Some more bird paintings where I have used negative painting to add feather detail


In conclusion, negative painting is an essential technique in watercolour painting that offers a unique and alternative approach to creating interesting compositions. You can also use this technique to add areas of detail on your subject.
By emphasising negative space and using negative areas to define your subject, you can achieve a sense of depth and three-dimensional form. By exploring the possibilities of negative painting, you can unlock the full potential of this beautiful medium and create captivating works of art.
So, next time you pick up your watercolour brushes, consider incorporating the negative painting technique to elevate your paintings to new heights.
If you are interested in learning to paint in watercolour, I have over 160 online, voiced over watercolour tutorials for all skill levels.
Some of the paintings shown in this post are available from the shop.
Further reading: 9 Watercolour Texture Techniques


