Wet on Wet, Wet on Dry, and Glazing. How do you know when to use each technique?
There are many different techniques, but the three techniques that watercolour artists use most often are wet on wet, wet on dry and glazing.
In this blog we'll discuss what each method involves and how you decide what technique you need to use when you are working on your watercolour painting.
First of all, what are the three different techniques?
Wet on Wet Technique
The wet on wet technique involves applying wet paint onto wet paper. It allows colours to blend and bleed into each other on the wet surface, creating soft and diffused edges.
The wet-on-wet technique is excellent for creating smooth gradients, soft backgrounds, and atmospheric effects.
Working with wet paint on wet paper is exciting and this is the best part of painting with watercolour. When you use the wet on wet technique on a watercolour painting you have less control of the paint because the pigment will bleed or creep over the wet surface. It's a little more challenging than the wet on dry technique.

Wet on Dry Technique
With the wet on dry technique, the wet paint is applied onto dry paper. It allows for more control and precision in the application of colours.
When you use this technique your brush strokes remain distinct and they will have sharper edges than the brush strokes you make when you work wet on wet.
Wet-on-dry is suitable for creating fine details, sharp lines, and defined shapes in your watercolour paintings. You will use the wet on dry technique as your painting progresses and you start to add details.

Watercolour Glazing Technique
Glazing involves applying transparent or semi-transparent layers of watercolour paint over a dried layer of paint. This technique allows you to build up colour intensity and depth gradually. By layering multiple glazes, you can create rich and luminous effects. We use the glazing technique if we want to modify or enhance the underlying layer of paint.
You have the option to layer multiple glazes of the same colour on top of each other to enhance tonal depth, or you can apply a different colour as a glaze over an existing one to produce a fresh and unique hue.
Unlike the wet-on-dry method, glazing is a technique that allows you to adjust the colour and tone of an existing area without altering its underlying details.
Glazing adds richness and complexity to your watercolour painting by modifying the colour and creating subtle variations, making it a valuable technique for achieving depth and complexity in your artwork.
How do you decide when to use each of these techniques in your paintings?
In watercolour painting, the choice of technique depends on the desired effect you want, the level of control you need, and the stage of your painting process.
When to use the Wet on Wet technique
Use the wet-on-wet technique when you aim for a spontaneous, fluid, and lively appearance in your work, particularly when you want soft edges on the paint marks you make with your brush.
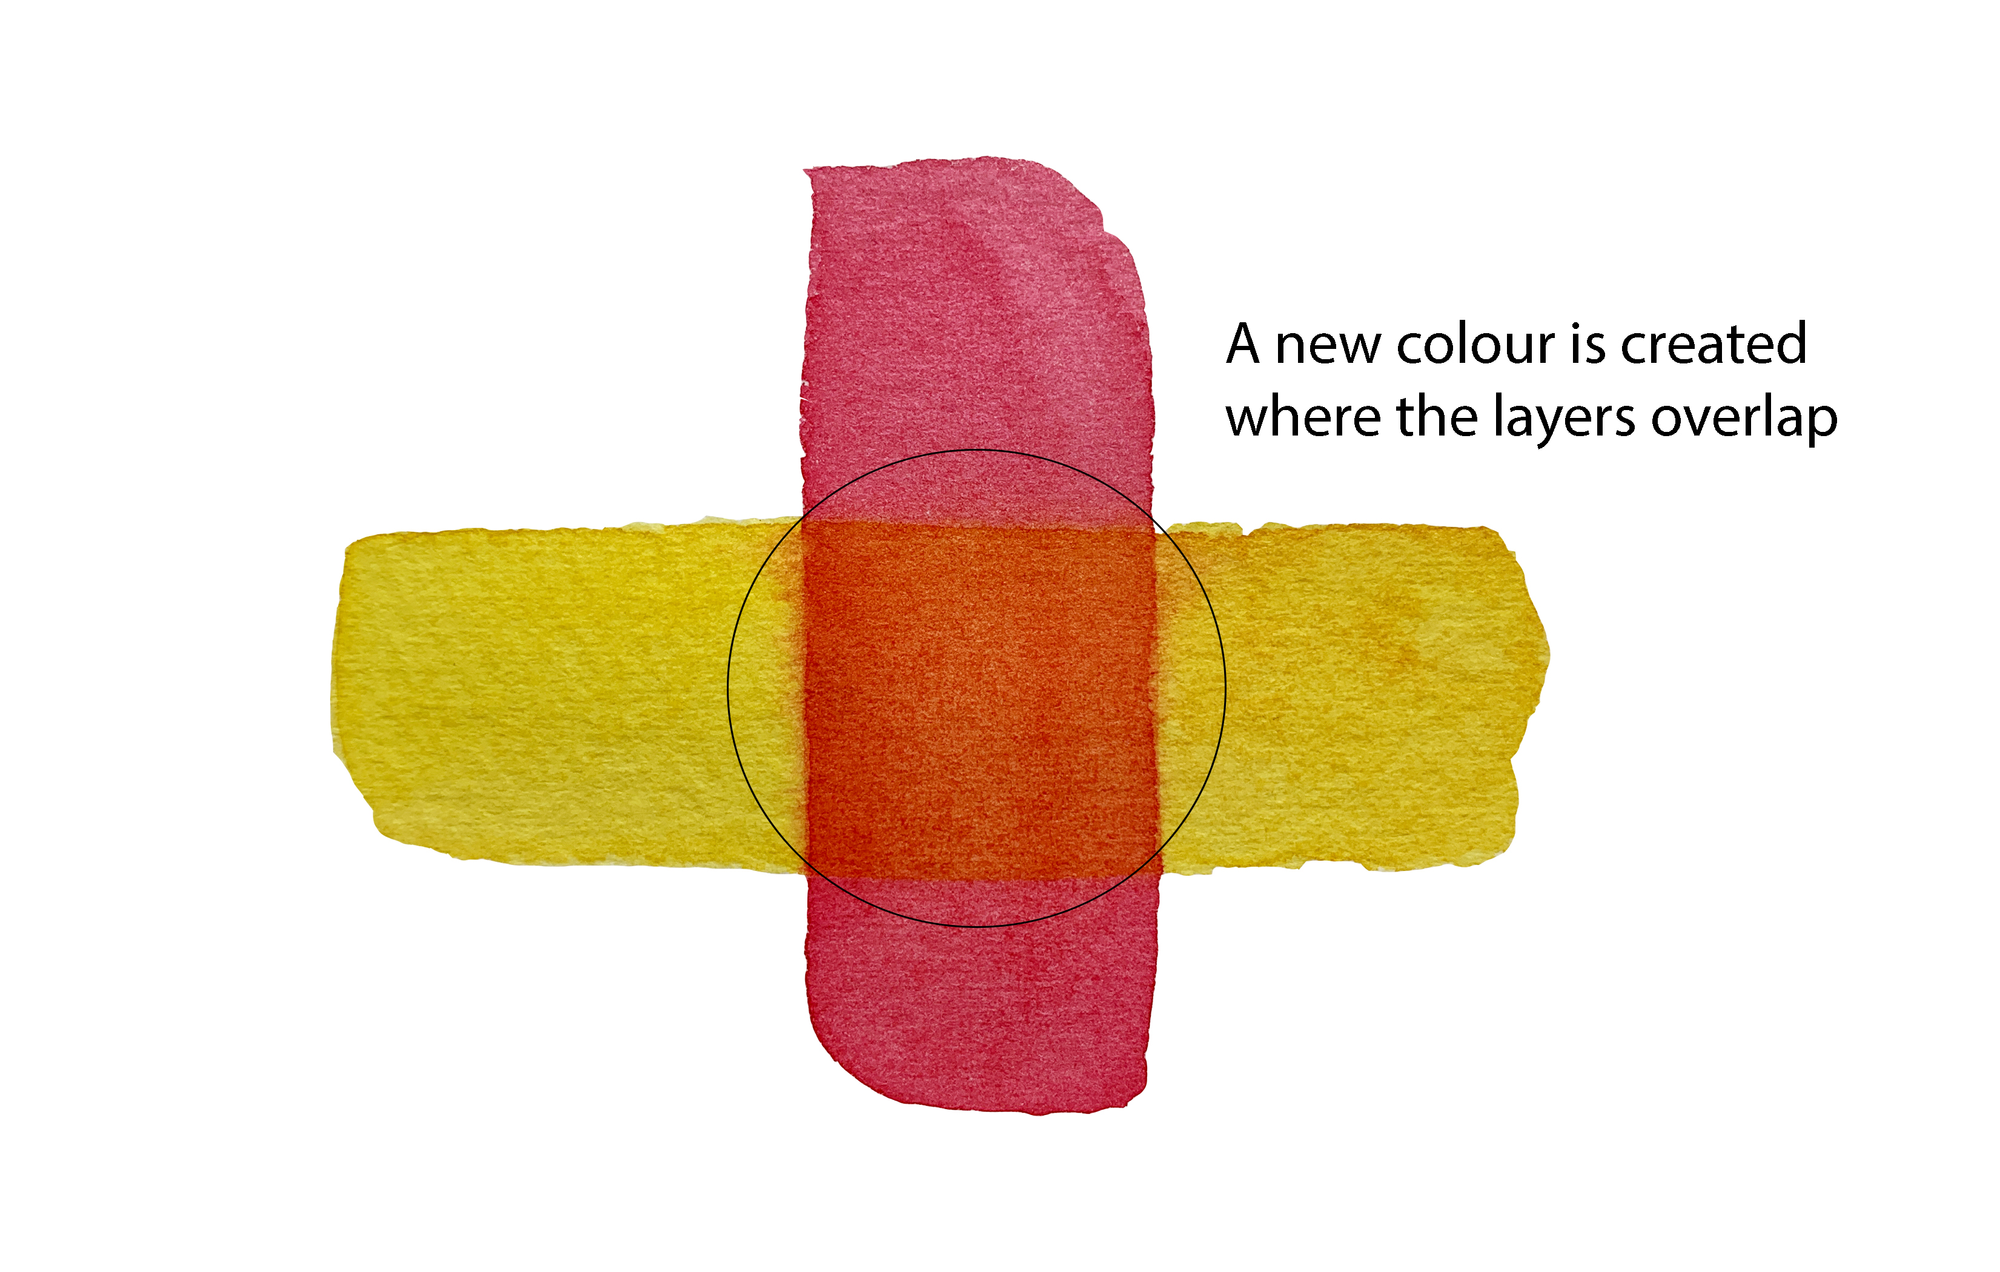
The shape below has soft edges.

You will most likely use the wet on wet technique when you are beginning your painting.
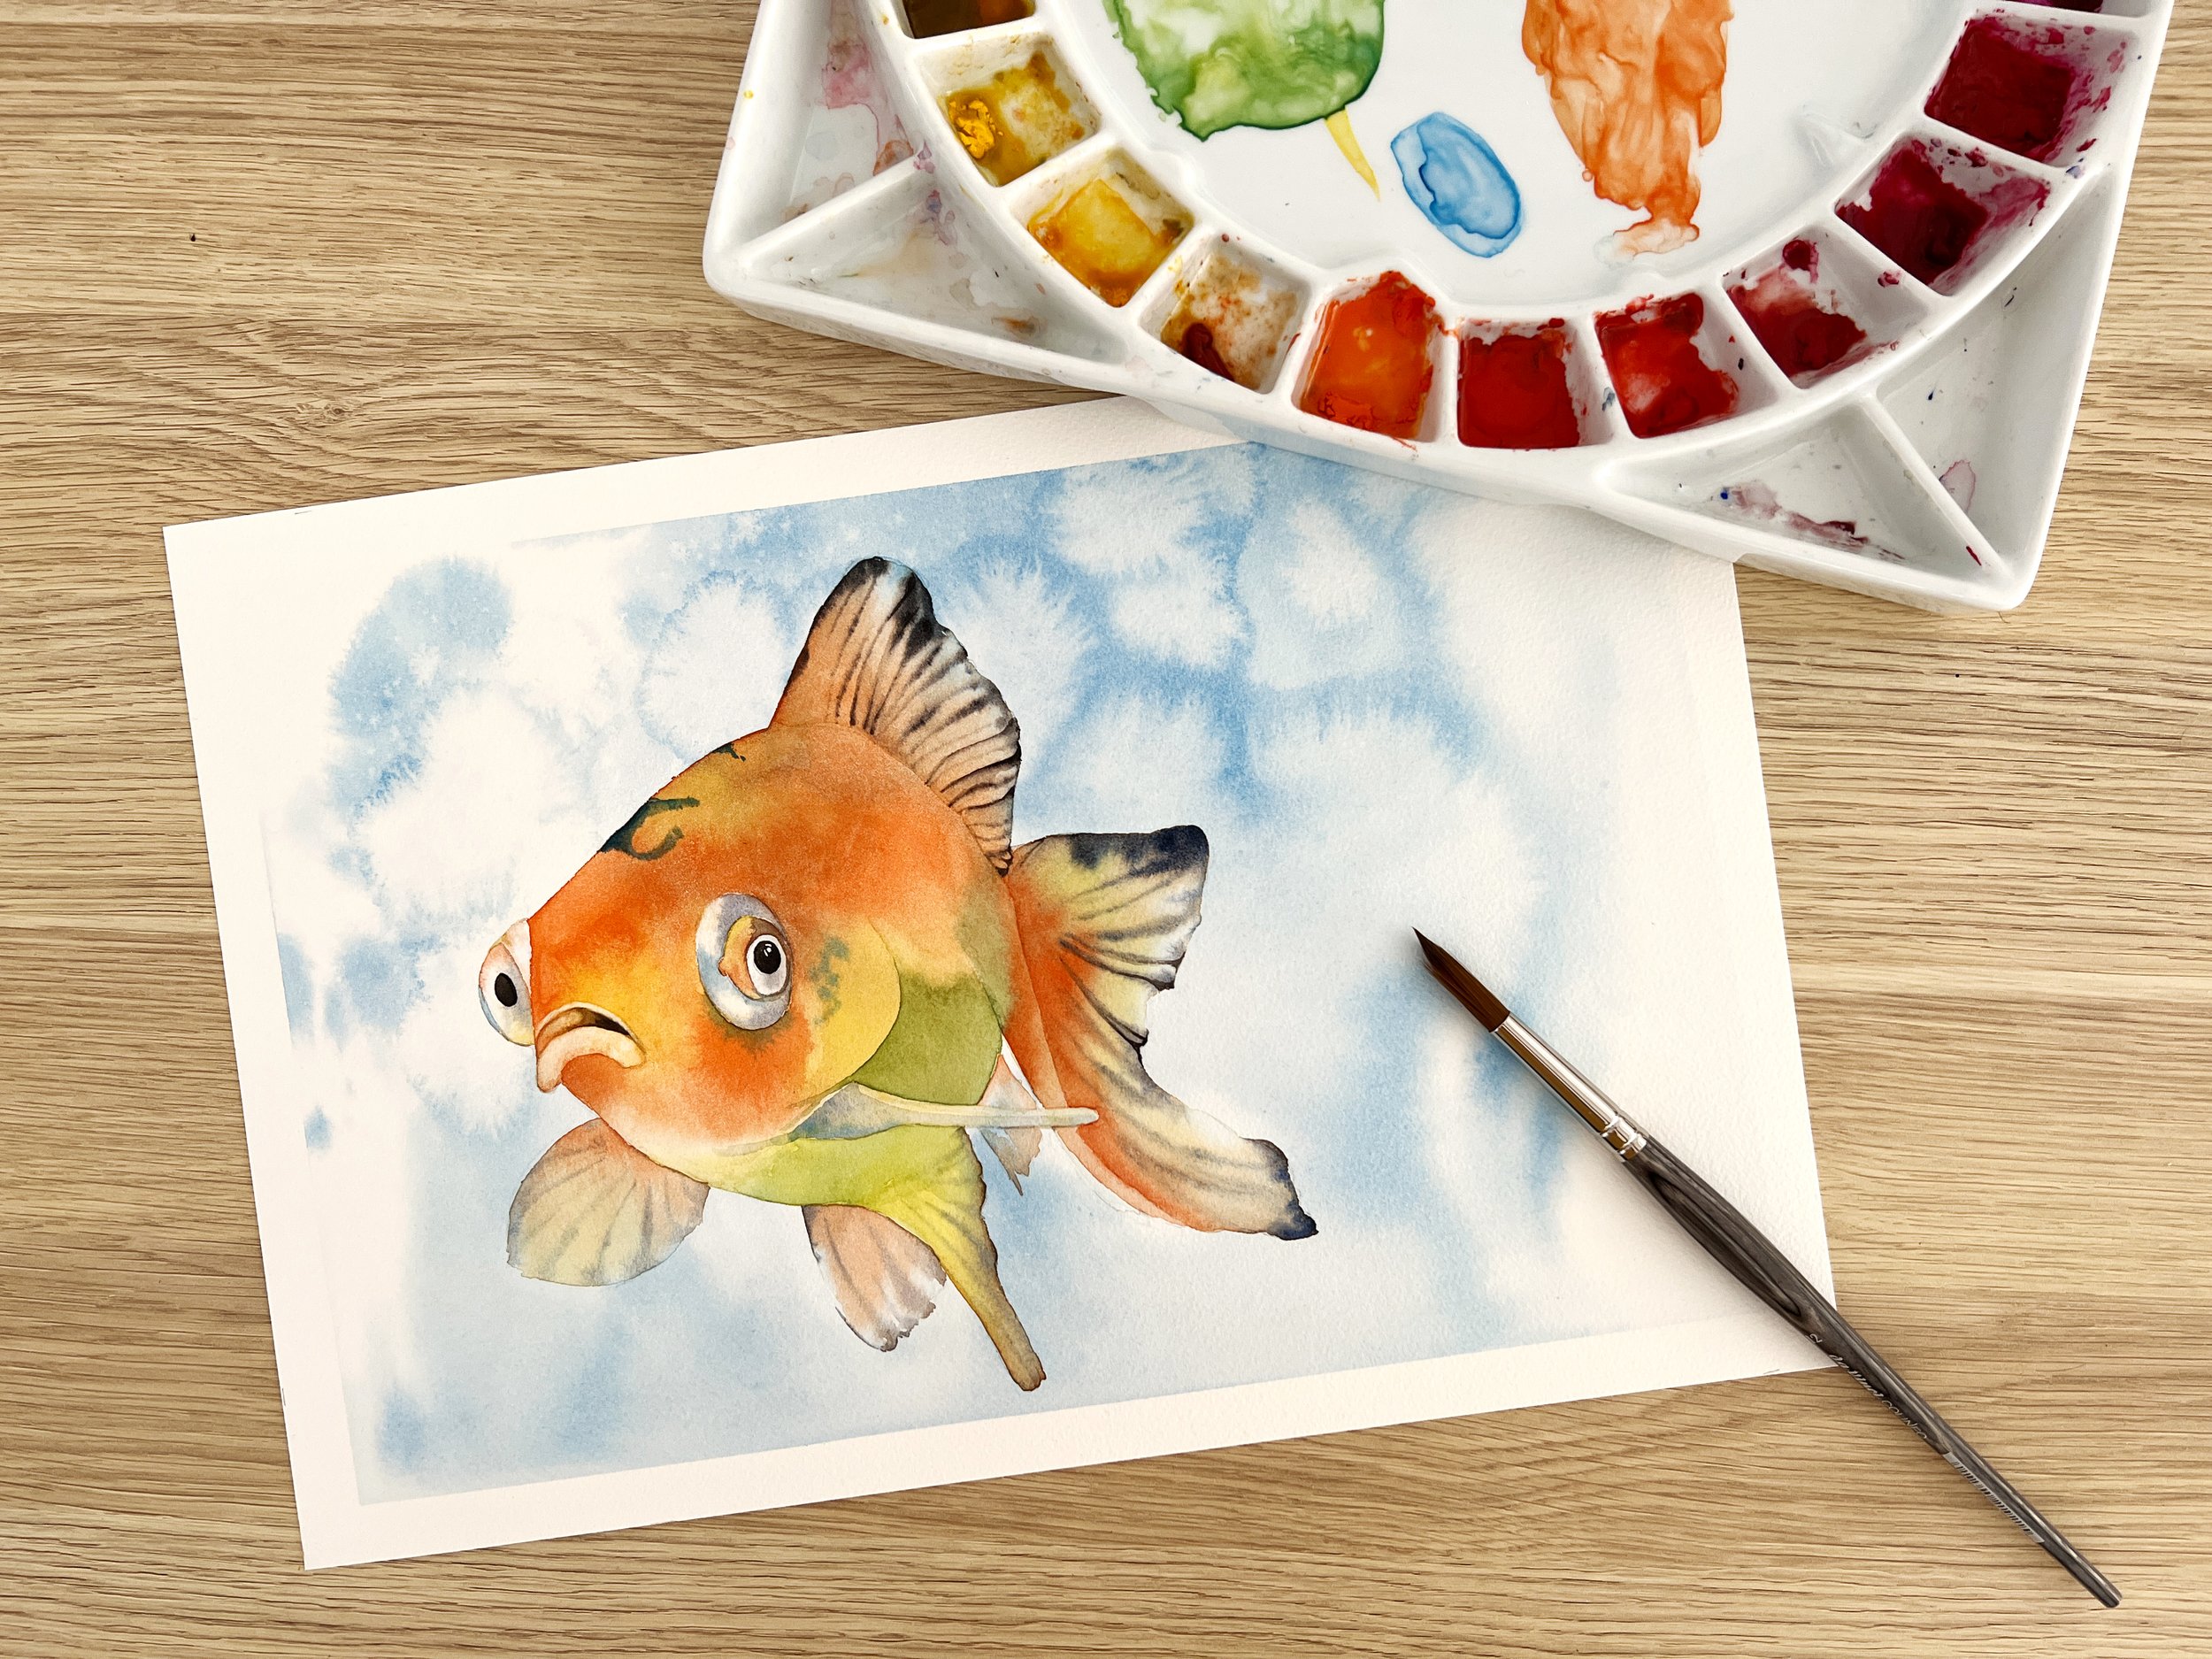
When I painted the Goldfish painting below I began by working the background wet on wet because I wanted a loose atmospheric, 'water-like' appearance.

I waited until the background started to dry and then I dropped some water onto it to create some intentional blooms. That added some visual interest to the painting.

When the background dried, I rewet the body of the fish with water and I painted it wet on wet. I used the wet on wet technique here because I wanted to make sure I had enough time to apply the paint to the paper before it dried and I also wanted the colours to blend seamlessly together.

I often use the wet-on-wet technique for timing purposes. When watercolour paint dries on dry paper, it tends to create hard edges. These unintended edges can appear where you least desire them. When tackling a complex, large shape, I find it more manageable to work on wet paper. This approach allows me to paint at a more deliberate pace, because I’m not concerned about the paint drying prematurely. Working on wet paper I can focus solely on forming the shape of the object precisely without the distraction of drying paint.
When to use the Wet on Dry technique.
The wet-on-dry technique comes into play when you're aiming for distinct and defined hard edges in your watercolour work. This method allows you to craft both positive and negative shapes as your painting evolves and you begin adding detailed elements. It's the go-to technique when you seek precise control over your paint application.
The shape below has hard edges because it was painted on dry paper.

When I painted the goldfish I used the wet on dry method to add detail. I painted the pupils on dry paper with wet paint and I used the wet on dry method to add some detail to the fins.

Wet on dry technique and soft paint edges.
Basically, when you want soft edges on the marks you make you would generally paint on wet paper, but you can also achieve soft edges on dry paper. To do that, you need to learn to soften paint edges manually with a damp brush. I have a video here where I demonstrate how to soften paint edges on dry paper.
When to use the Glazing technique
You use the glazing technique when you want to alter an existing layer of paint. You may want to deepen the tonal value of an area and you can do that by using the same colour as the underlying layer or you can use a different colour to create a new hue.
On the goldfish painting I glazed some green paint over the top of the yellow area to modify the colour.

I softened the top edge of the glazed area with a damp brush.

You can also glaze colour over your entire painting to increase colour harmony or alter the mood of your painting.
Just remember that while both wet-on-dry and glazing techniques involve applying paint to dry paper, glazing primarily focuses on modifying colour and creating subtle layers, while wet-on-dry is more about achieving well-defined details and edges.
In summary
Use the wet on wet technique to create beautiful soft edges and atmospheric effects. Mix colours on the paper and let them run into one another.
Use the wet on dry technique when you want to create hard edges and add detail to your painting.
Use the glazing technique when you want to add depth, change colours or increase colour harmony.
In your watercolour journey, the choice of technique depends on the effect you envision, the level of control you require, and the stage of your painting process. Embrace these techniques as your creative allies, each contributing to the story you wish to convey on paper.
Happy painting!
If you are interested in learning to paint in watercolour, I have over 170 online, voiced over watercolour tutorials for all skill levels.
The “cow in water” is available to purchase as a print in the shop.
Further reading: 9 Watercolour Texture Techniques


